> For the complete documentation index, see [llms.txt](https://creed-v-2-tm.gitbook.io/creed-v.2-tm-docs/llms.txt). Markdown versions of documentation pages are available by appending `.md` to page URLs; this page is available as [Markdown](https://creed-v-2-tm.gitbook.io/creed-v.2-tm-docs/product-guides/select-your-game/creed-permanent-spoofer-guide.md).
# Creed Permanent Spoofer Guide
{% hint style="success" %}
**READ ME:** Make sure to follow all the steps and don't skip any. If you're unsure about a step, please contact our ticket support.
{% endhint %}
To use the Creed **Permanent Spoofer** effectively, follow the instructions carefully. This will ensure it works well and reduces mistakes. Don't skip steps, and reach out to support if you need.
## BIOS Config:
### GO TO BIOS AND FOLLOW THE STEPS:
**HOW TO EASILY BOOT INTO BIOS**: [**YOUTUBE TUTORIAL HERE**](https://youtu.be/mb9X9_NNxuo?si)
#### DISABLE TPM IN BIOS
**DISABLE TRUSTED COMPUTING MODULE:**
{% hint style="warning" %}
**NOTE:** With a new TPM chip, there is no need to disable.
{% endhint %}
🔹ASUS TPM DISABLE
[**Watch this simple tutorial video**](https://streamable.com/sicp16)**. INTEL** 00:00 & **AMD** 01:20
**IN CASE YOU CAN'T DISABLE TPM:** Open powershell as admin, and execute the following commands: **`Get-BitLockerVolume`**
**IF PROTECTION STATUS IS ON: `Disable-BitLocker -MountPoint "C:"`**
**IF OFF, OR YOU DISABLED BITLOCKER, DO: `Permanent TPM Bypass On Spoofer Loader`**
**This will make sure TPM cannot be queried/read/banned.**
🔹MSI TPM DISABLE
[**Watch this simple tutorial video**](https://streamable.com/n7q3dk)**. INTEL** 00:00 & **AMD** 01:20
**IN CASE YOU CAN'T DISABLE TPM:** Open powershell as admin, and execute the following commands: **`Get-BitLockerVolume`**
**IF PROTECTION STATUS IS ON: `Disable-BitLocker -MountPoint "C:"`**
**IF OFF, OR YOU DISABLED BITLOCKER, DO: `Permanent TPM Bypass On Spoofer Loader`**
**This will make sure TPM cannot be queried/read/banned.**
🔹ASROCK TPM DISABLE
[**Watch this simple tutorial video.**](https://streamable.com/ec8u3s) **INTEL** 00:00 & **AMD** 01:20
**IN CASE YOU CAN'T DISABLE TPM:** Open powershell as admin, and execute the following commands: **`Get-BitLockerVolume`**
**IF PROTECTION STATUS IS ON: `Disable-BitLocker -MountPoint "C:"`**
**IF OFF, OR YOU DISABLED BITLOCKER, DO: `Permanent TPM Bypass On Spoofer Loader`**
**This will make sure TPM cannot be queried/read/banned.**
🔹GIGABYTE/AORUS TPM DISABLE
[**Watch this simple tutorial video.**](https://streamable.com/1qhn35) **INTEL** 00:00 & **AMD** 01:20
**IN CASE YOU CAN'T DISABLE TPM:** Open powershell as admin, and execute the following commands: **`Get-BitLockerVolume`**
**IF PROTECTION STATUS IS ON: `Disable-BitLocker -MountPoint "C:"`**
**IF OFF, OR YOU DISABLED BITLOCKER, DO: `Permanent TPM Bypass On Spoofer Loader`**
**This will make sure TPM cannot be queried/read/banned.**
TURN OFF WIFI AND BLUETOOTH \[ IMPORTANT ]
{% hint style="warning" %}
**ONLY DO THIS STEP IF YOU HAVE WIFI/BLUETOOTH AVAILABLE, OTHERWISE SKIP IT.**
{% endhint %}
## Reinstallation
🌟 **Easiness**: **8/10 VERY EASY**** | Takes max 15 Minutes.** 🕒
**Am I disk banned? This is how to know****:** If multiple spoofers have failed and you've been banned several times on the same PC, it could be a disk ban. In such cases, we recommend reinstalling Windows using a USB, following the instructions provided below.
🔹 I DONT HAVE AN USB/HELP ME! |IT LOOKS TOO HARD FOR ME!
Trust the process. It may seem overwhelming at first with all the images and details, but it’s easier than it appears! We encourage you to give it a shot. If you need help, feel free to reach out to us on Discord. 💚
Don’t have a USB for the reinstall? Most cost around $2-5 just get the 8GB one, and it’s highly recommended to get one.
**Alternatively, you can reinstall Windows by going to Settings** > Reset this PC > Remove everything > Cloud download > **Change settings** > Clean data **\[YES**] / Delete files from all drives **\[YES]** / Download Windows **\[YES]** > Confirm & Next, then wait. This process may take 1 to 3 hours.
#### REINSTALL WINDOWS WITH A USB ( RECOMMENDED )**NOTE:** When reinstalling Windows, most modern systems will automatically detect and install basic Ethernet drivers, so your connection should work fine after installation. ✅
**In some cases, you may need to manually download and install network drivers.**
To be safe, download the network drivers (LAN) for your motherboard model. For example, search "Gigabyte A520M KV2 1.1 Network drivers" on Google, and save them to your USB drive. This step is optional, but there's a small chance you may lose connection after the Windows reinstallation. 🌐1. Download Media Creation Tool above, click **"Download Now"**
2. Open the **Media Creation Tool as an administrator**
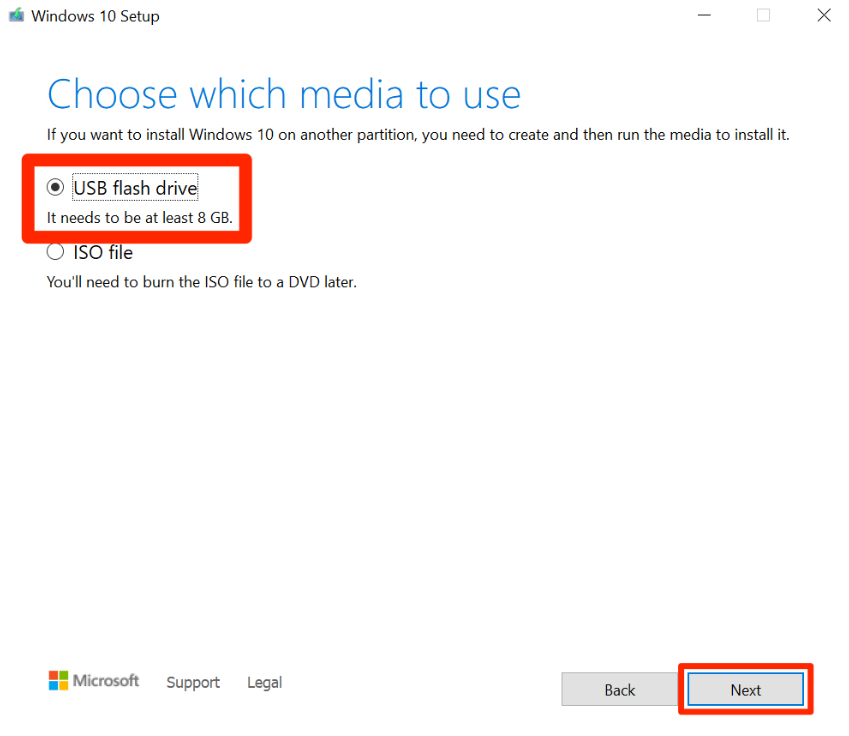
3. Select **Create Installation media (USB Flash drive)**
4. Use all the recommended options & continue & wait for it to finish.
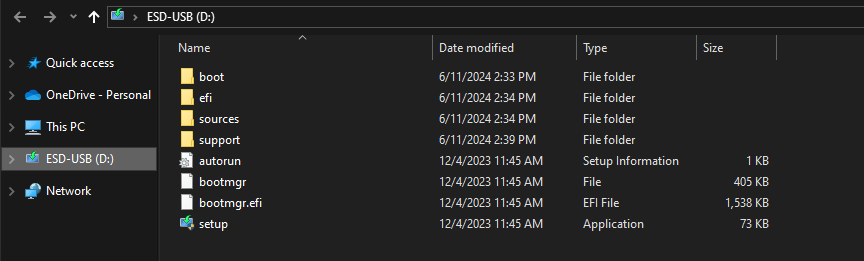
5. #### YOUR USB SHOULD LOOK LIKE THIS
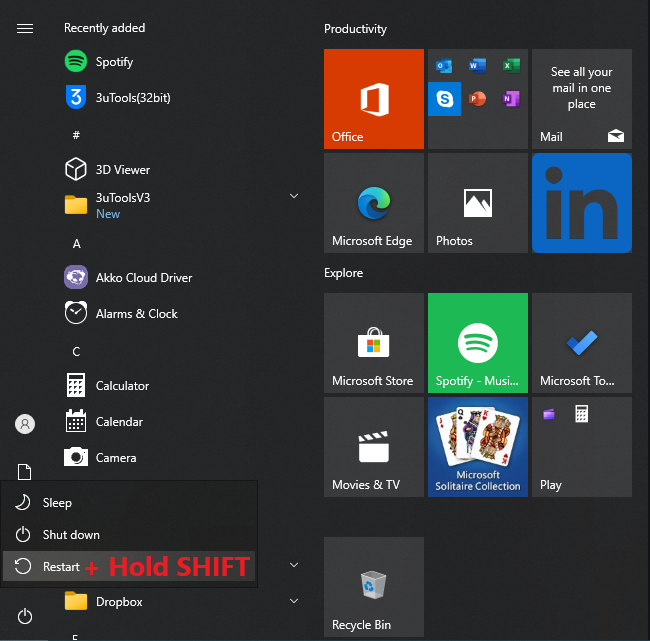
6. Hold SHIFT, and click Restart and keep holding SHIFT!
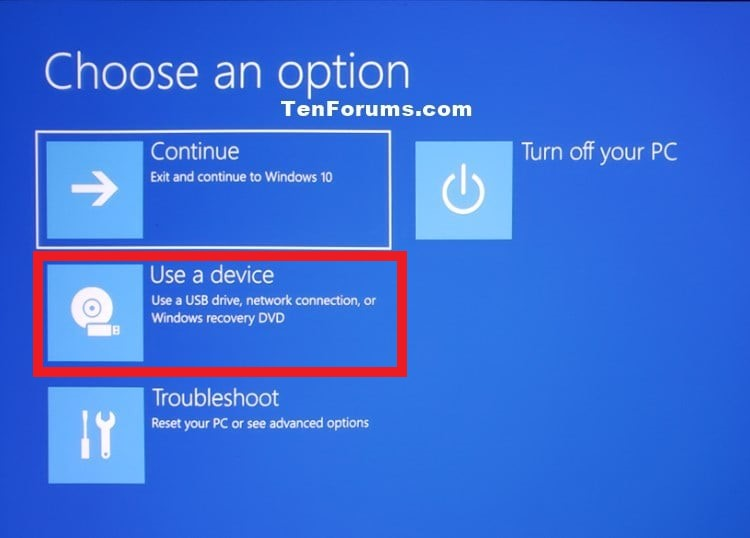
7. Select **Use a device** and select the USB *(Known as "Flash Drive")*
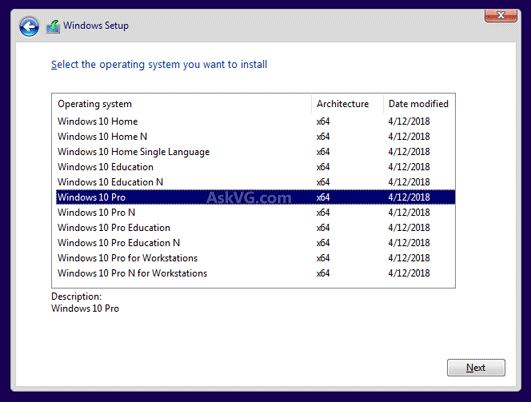
8. Select **Windows 10 Pro** **(IMPORTANT!)**
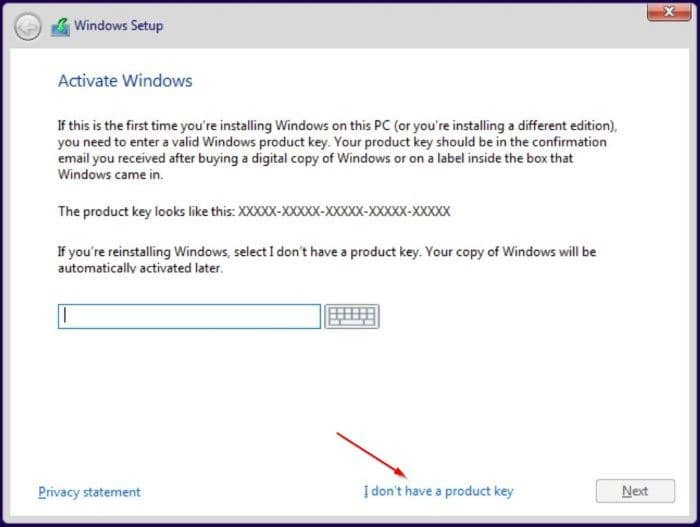
9. Select **"I don't have a product key"** (No worries about this)
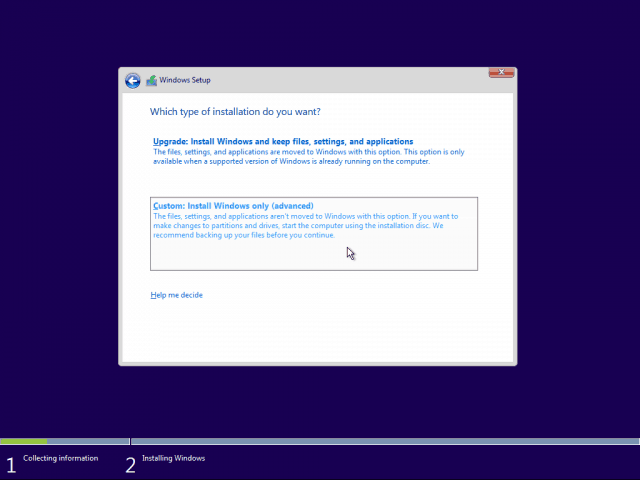
10. **Select Custom:** Install Windows Only (advanced)
11. Press **SHIFT + F10** (A CMD will pop up)
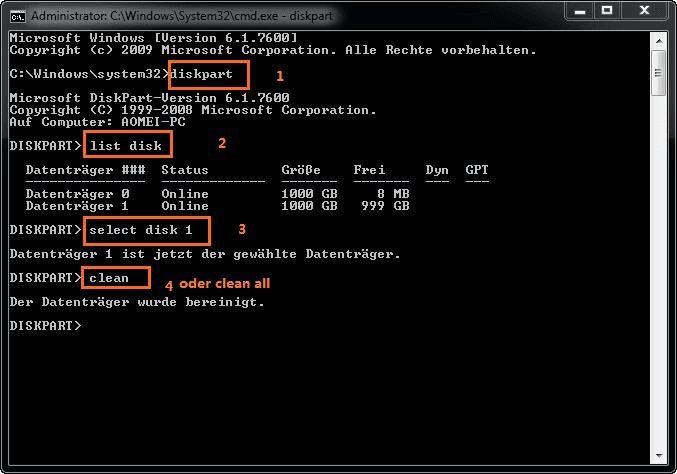
12. Now write `diskpart` into the CMD
13. Then write `list disk` into the CMD to see all ur drives
14. Write `select disk 'X'` (X = Disk number) then write `clean` for ALL disks, besides ur USB.
\*\*\*
{% hint style="danger" %}
**For example,** if you have only one disk, type **'select disk 1**' and then **'clean'.** If you have two drives, type 'select disk 2', then 'clean', and repeat for other drives as needed. ✅
Flash drives (USB) are usually smaller in size than internal hard drives or SSDs, and they are likely listed last. **DO NOT clean your flash drive (USB)!**
**Still unsure? Contact us, and we’ll help you through it together. 🤝**
{% endhint %}
Now it should output: 'Succeeded in cleaning the disk' or something related to 'success'
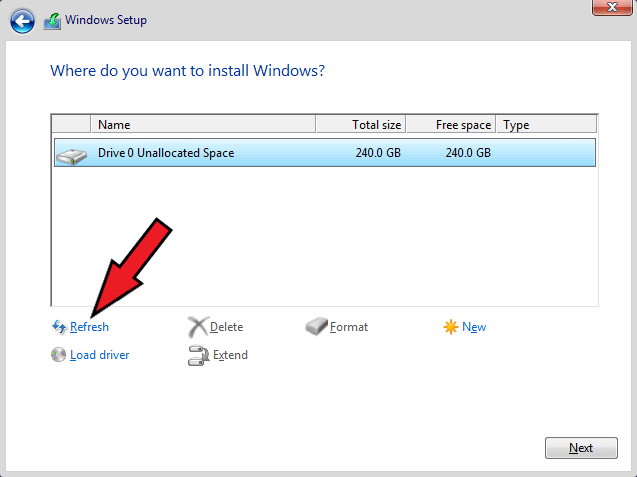
16. Close the CMD and click **Refresh**
16. Select your **main drive** (Unallocated Space) and click **Next**
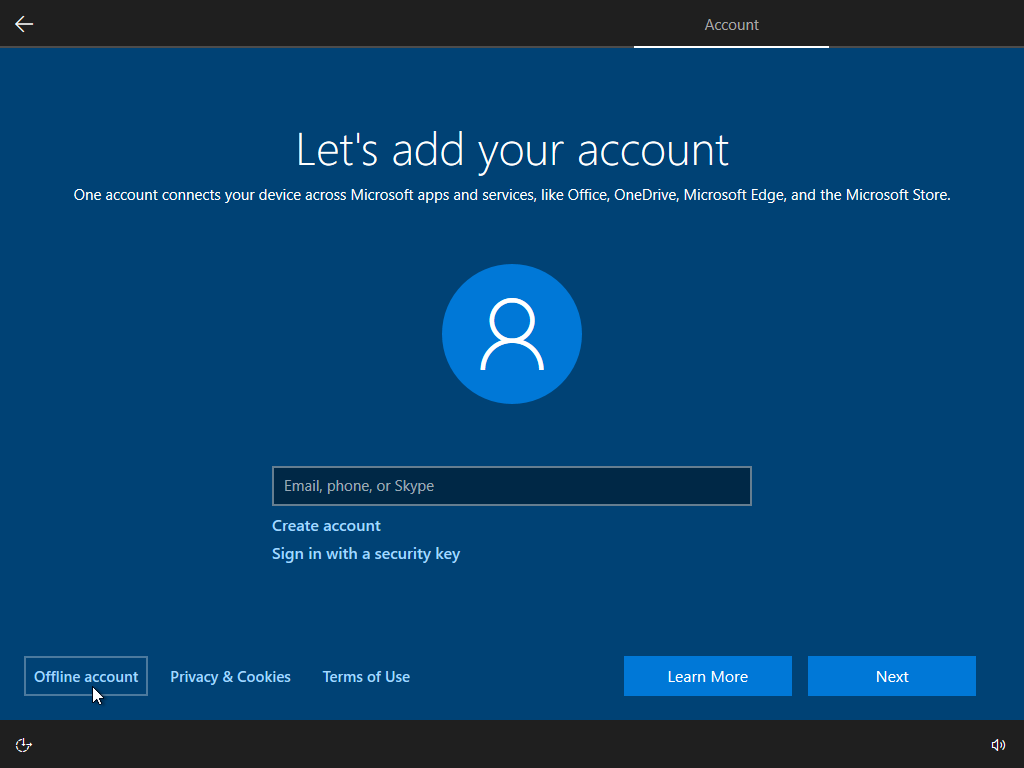
17. The installation process should start, AND MAKE AN OFFLINE ACCOUNT!
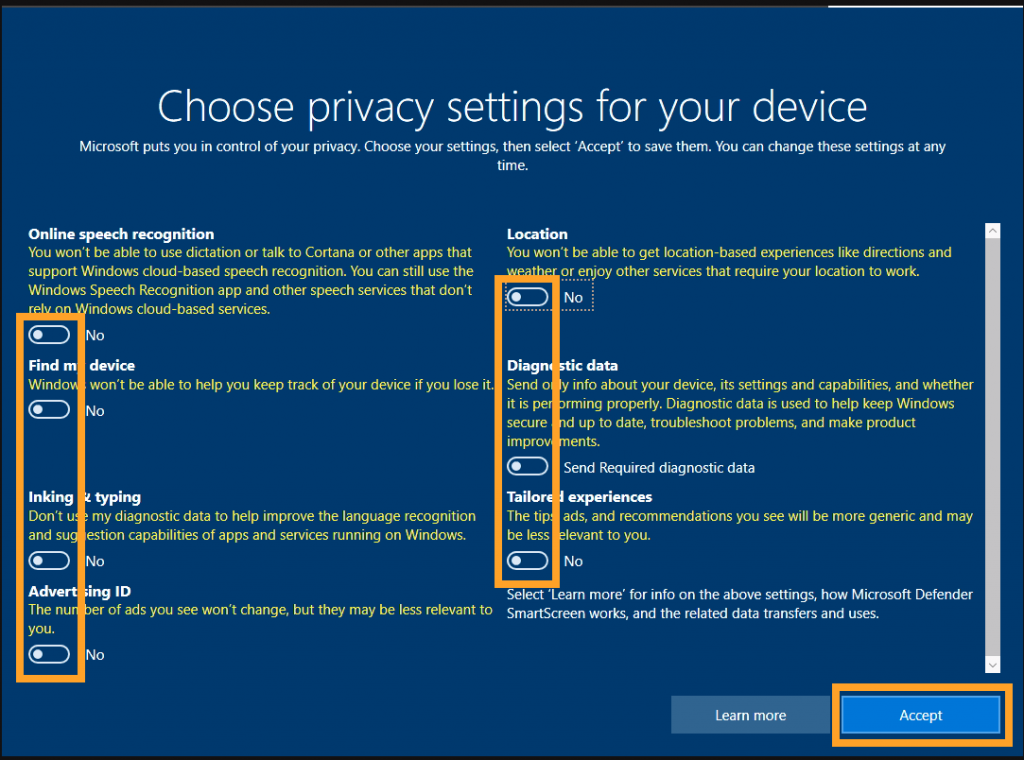
16. Turn **OFF** All privacy questions/settings
#### **Make sure to follow these steps while and after reinstallation:**
1\. Make an offline account or a new Microsoft account. Don't login to ur old one.
2\. Do not login to OneDrive, Geforce Experience, & Medal using same account.
3\. Install: [https://aka.ms/vs/17/release/vc\_redist.x64.exe ](https://aka.ms/vs/17/release/vc_redist.x64.exe)to prevent any errors.
{% hint style="danger" %}
**Make sure to follow these steps while and after reinstallation:**
1\. Make an offline account or a new Microsoft account. Don't login to ur old one.
2\. Do not login to OneDrive, Geforce Experience, & Medal using same account.
3\. Install: [https://aka.ms/vs/17/release/vc\_redist.x64.exe ](https://aka.ms/vs/17/release/vc_redist.x64.exe)to prevent any errors.
{% endhint %}
## Windows Setup
Installing dependencies to ensure spoofer works properly
{% hint style="warning" %}
#### **USB Drive Notice**
**Please unplug any USB drives before spoofing or launching the game.**
Before continuing, make sure to download and install the following:
* 📁 **WinRAR** [Download WinRAR](https://files.moonlights.cc/share/xAMhlPrG)
* 🧱 **Visual C++ Runtimes (All-in-One)** [Download VSRuntimes](https://www.techpowerup.com/download/visual-c-redistributable-runtime-package-all-in-one/)
B devices plugged in may interfere with spoofing or increase detection risk.
{% endhint %}
## Normal Permanent Spoof
STEPS:
Eon Permanent Spoofer - Homepage
Eon Permanent Spoofer - Spoofing Page
* As soon as `Permanent spoof completed` appears, close the spoofer, and restart PC.
* **If you did not do** [https://spiritxx.gitbook.io/eon/getting-started/quickstart/raid-reinstallation](https://spiritxx.gitbook.io/eon/getting-started/quickstart/raid-reinstallation "mention") **please do** [https://spiritxx.gitbook.io/eon/miscellaneous/vhd-guide-eac-be](https://spiritxx.gitbook.io/eon/miscellaneous/vhd-guide-eac-be "mention")
***
#### EFI Spoof Method
1. Go to Custom Spoofing Tab
2. Click on **EFI SPOOF - Auto**, and wait until it's finished.
3. Go into your **BIOS**, and boot into the partition labeled **"UEFI OS"** or **"UEFI Partition 1"**. *(Always choose UEFI)*
4. After booting, check your serials again to confirm they’ve been spoofed successfully.
5. You're fully spoofed.
---
# Agent Instructions
This documentation is published with GitBook. GitBook is the documentation platform designed so that both humans and AI agents can read, navigate, and reason over technical content effectively. Learn more at gitbook.com.
## Querying This Documentation
If you need additional information that is not directly available in this page, you can query the documentation dynamically by asking a question.
Perform an HTTP GET request on the current page URL with the `ask` query parameter, and the optional `goal` query parameter:
```
GET https://creed-v-2-tm.gitbook.io/creed-v.2-tm-docs/product-guides/select-your-game/creed-permanent-spoofer-guide.md?ask=&goal=
```
`ask` is the immediate question: it should be specific, self-contained, and written in natural language.
`goal` is optional and describes the broader end goal you are ultimately trying to accomplish on behalf of the user. GitBook uses it to tailor the answer towards what is most useful for that goal.
The response will contain a direct answer to the question and relevant excerpts and sources from the documentation.
Use this mechanism when the answer is not explicitly present in the current page, you need clarification or additional context, or you want to retrieve related documentation sections.